Synchronizer token pattern is one of the prevention methods
for Cross-Site Request Forgery (CSRF). It uses a value called CSRF token which is
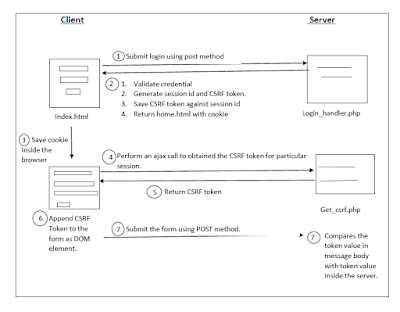
unique for a session identifier. When the user login to a website, the server
generates a random value called token for a particular session. The token is saved
on the server as well as the browser (after obtained from the server). PHP
identifies the session using the session variable ‘PHPSESSID’ which is also stored
in the browser as the cookie to identify a particular session. The server
validates the user when each request is made, via comparing the token value in
the server and token value in the browser. Through this write up how
synchronizer token pattern is implemented and how does it works will be
described.
(Click on the images to view clearly)

I
have implemented a login page called index.html to enroll a user to the server.


The username and the password are hardcoded. When the form is submitted, the form data will be submitted to login_handler.php. According to the program, if the user enters a valid username and password, the user will be redirected to the home.html form while creating the session identifier. By default, the session identifier is saved as a cookie in the browser when session_start() is activated. At the same time, cryptographic random value (CSRF token) is generated in binary in size of 32. It is converted to hex value and assign to session variable called token. Invalid credential redirects the user to the login page again.


The server-side program called get_csrf.php will return the stored CSRF token for
the particular session in the JSON encoded format.

In home.html a javascript code is implemented to get the CSRF
token value from the server. The script will be executed when the home page is
fully loaded. We have written an ajax call to get the token value from
get_csrf.php. Ajax call processes the request in the background without
refreshing the page and returns the intended value. Through jquery, the returned
string value of ajax request is converted to JSON using json.parse(function).
The JSON object will then be assigned to the variable named ‘obj’ and the CSRF
token will be extracted. The extracted CSRF token will be set to the
hidden field (to DOM element) of the form using the hidden filed's id called
’dom_csrf’.

When the user submits home.html form, the form
data will be sent to form_submit.php.

The CSRF token stored in the hidden field also will be sent
along with other data of form to form_submit. After the server got the request, the
CSRF token received through the form data and the CSRF token stored in the
particular session will be compared. If it is matched, the request will be accepted
and a success message will be shown. Otherwise, a message that says the token
value is not matched is displayed when the token is mismatched or the token not
exist.

Comments
Post a Comment